3D printed gun

liberator-pistol-3d-printed-parts-640x440
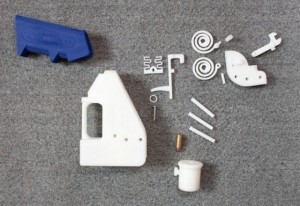
With all the advances in 3D printing, it was inevitable that someone, someday, would create a 3D printed gun…and that day is here.  The only non-plastic parts are the firing pin, and the bullet.  Everything else is plastic, printed on a Stratasys Dimension SST 3D printer in ABS…a step above the hobbyist grade 3D printers like the Cube.

As far as firearms go, this one is pretty crude – it’s a single shot device which must be manually loaded, and a test with a larger caliber bullet resulted in destruction of the gun (the successful test used a .380 caliber round).

So, this is very much an immature product, but represents a huge milestone for the technology.  There are those who believe that our species can create amazing technology and regulate it to the point where it is safe for society, but the reality is that technology can be used for both good and bad, and attempts to regulate that are eventually futile.

If you want to download the models yourself, head to DefCAD.  I wouldn’t recommend it though…this is a marginal design and really more of a proof of concept…be careful.  Note that in the test firings, a string was used to actuate the trigger.

Read more at ExtremeTech.

Part Design for 3D Printing on a Cube

bracket_originalI’ve been really enjoying my Cube printer, but it has not been without its learning curve.  Like any part design, you need to design the part with the manufacturing process in mind, and I’m learning quite a bit about extruded filament part production.

One issue is that large parts with thick sections tend to warp.  The Cube software provides an option for a raft – basically a lattice of thin lines laid down first, providing a stable bed upon which to build the part – but this greatly increases the post-processing time.  Namely, you need to scrape or sand off the raft.  It’s not a huge deal but does waste material and time.

Consider the bracket design shown above.  It’s simple enough, with a uniform cross section and was designed to be printable without needing supports (thin webs of material to support overhangs and such).  However, when printing, this part would warp and curl, forcing me to abort the print.

To address this, I did a few things.  First, I added thin tabs at the corners to help hold those down.  The principle is similar to the raft, but much easier to clean up (just cut them off – very quick and clean).  This alone did not produce a repeatable, printable part.  So, I added large chamfers at all edges, to reduce the part thickness and reduce warping.  This did the trick, and I was able to repeatedly print this (I’m using ABS, for what it’s worth).  Here’s what the final design looks like:

bracket_mod

As I learn more, I’m just not seeing how this technology is ready for mainstream home use like some articles seem to suggest.  You need to be a tinkerer and know your way around CAD to get parts that are really going to do what you want.  For that type of person though, this printer is fantastic!  I’ve been able to iterate prototype parts much quicker than before and am producing better designs, faster.

Gigabot – large-scale 3D printing

3D printing is taking a big step forward with the Gigabot, a Kickstarter project that aims to produce a 3D printer with a massive 24x24x24″ build envelope!  Ready-to-assemble kits cost $2500 (pay more if you want it assembled for you).  Cool stuff, though I’m not quite sure the market is ready for this (apart from those people wishing to print cool lamp shades…).


MakerBot Digitizer Desktop 3D Scanner

Makerbot just unveiled a prototype of a new 3D scanner at SXSW, designed for the casual 3D printer users out there.  It’s fast, but what’s really key is that it produces water-tight models (no gaps in the surfaces) that are ready to scale and send to your printer.  At this point, details are sparse…stay tuned to this blog for updates or sign up for email updates directly from the source at Makerbot.

Proudly powered by WordPress | Theme: Baskerville 2 by Anders Noren.

Up ↑