Review: camping mugs

No camping trip is complete without a good cup of coffee in the morning!  This is even more important when backpacking, as your surroundings are so idyllic that enjoying good coffee just caps off an already magical experience.  With that in mind, this review is focusing on my quest to find a really good backpacking mug for coffee and tea.

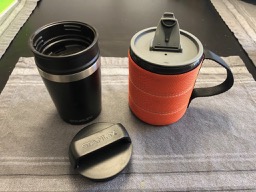
There are a few basic criteria any cup must meet.  First, it must be at least partially insulated…it gets cold in the mountains of Colorado!  Second, it must have a lid for sipping.  Lastly, it must have a handle that I can use to clip it to my pack if I feel like it (translation – if I’ve packed too much and don’t have space for the mug inside my pack 😉 ).  Shown above are my two current favorites.
GSI Outdoors Infinity Backpacker Mug

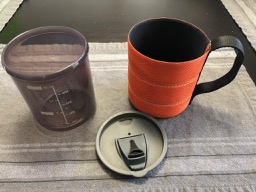
Let’s start with the orange one, The GSI Outdoors Infinity Backpacker Mug (starting at around $10 at Amazon, depending on color).  The soft outer shell doesn’t provide a ton insulation, but does prove sufficient.  it holds a cavernous 17oz, and has a sturdy lid – while the lid is just a friction fit, it’s snug doesn’t come loose.  Another nice feature is that the plastic inner cup is removable and you’ll notice it has markings on it for up to two cups.  This is especially useful if you’ve packed dehydrated meals and need to measure out hot water for those!  All in all, a robust, quality mug that I used a ton last summer.
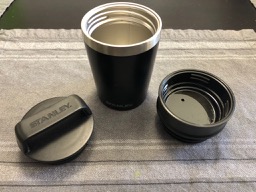
New to the game is the Stanley Adventure Vacuum mug, a story double-walled stainless steel option.  At around $15 at Amazon, it’s more expensive than the GSI, but I have little doubt it’ll last longer.  It’s really tiny, with a measly 8oz capacity, but what drew me to this, apart from the double walled stainless construction, was its clever lid system.  There are two lids…one a sippy lid, the other a solid lid with a handle that a carabiner can easily clip to.  You can use either lid, or – this is the clever part – both lids at the same time.  So when packing, you screw the sippy lid on first, then the solid lid, and you’re good to go, with no concern about anything coming loose and falling off along the trail.

So, which is better?  Well I love the ruggedness and double-wall insulation of the Stanley and for car camping, it’s an obvious choice, even with its minuscule capacity.  But for backpacking, there’s one more important test:
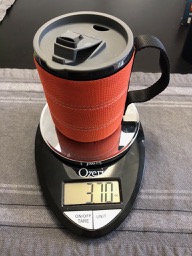
The GSI Outdoors Infinity Backpacker Mug weighs in at a featherweight 3.7oz.  It really is light, especially for its size.  Plus, it has a second function, to measure liquids to re-hydrate meals.  Bonus!
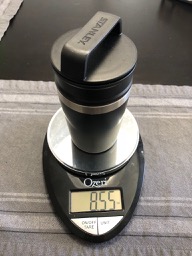
Ah, but then we get to the Stanley Adventure Vacuum mug, and its rugged construction really shows on the scales.  This mug holds half the amount of the GSI, but weighs more than twice as much!  8.5oz, that’s just over half a pound!

Sorry Stanley.  You’re an awesome mug and I love ya, but you won’t be joining me on any backpacking trips!  We’ll hang out car camping sometime though, I promise. 😉

Review: VivoBarefoot Trail Freak Winterproof

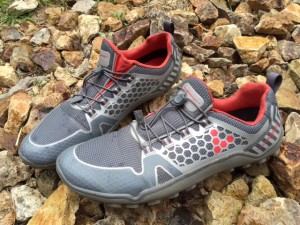
IMG_5450I live in Colorado…when winter comes, I can either hop on a treadmill, or head out into the snow for a run!  Perhaps someday I’ll do a review of my treadmill someday…but the mere thought of that beast sends shivers down my spine…so let’s focus on the joys of trail running in winter in Colorado instead.  If you’re going to have fun doing that…you need the right equipment.  There’s nothing better than running at night when it’s lightly snowing!  Assuming of course you’re staying warm and cozy, and slipping and sliding all over the place.  Again, it all comes down to having the right equipment…and after spending my winter training for an April marathon, I’ve found some equipment that works great for me.  Starting from the bottom up, let’s talk about shoes, and my absolute favorite (for winter), the Trail Freak Winterproof from VivoBarefoot.

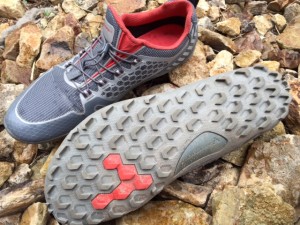
They’re very similar to the standard Trail Freaks, but with waterproof construction and a removable insole.  These different materials result in a shoe that’s much smaller than Vivo’s normal sizes – I own several VivoBarefoot shoes (both on and off road shoes), all size 44, and these size 44 Winteproofs were really snug in the toe section (compared to the wide, loose feel in the toes in the others).  After 180 miles in them they’ve loosened up a bit, but they’re still nowhere near as roomy as my Neo Trails.  The liner can be removed (which results in a more normal VivoBarefoot fit, still slightly snug though by comparison), but with just a 3mm sole, I want to keep that in there to insulate my feet from the snow I’m running on.  So, I cope, but consider ordering a size up from normal if you get these.  I wasn’t sure how I’d like the drawstring style laces, and while I found they do loosen up a bit, the shoes themselves never felt loose.

Traction in the snow and ice is phenomenal; they use the same tread and sole design as the proven Neo Trails and Trail Freaks.  Traction won’t be a problem.  Running through puddles and slush is a breeze…water does get in around my ankle, but the rest of the shoe does a good job of keeping the foot dry (the tongue is not a loose piece, its sides are joined to the rest of the shoe like a waterproof hiking boot would be, this undoubtedly helps).  Warmth is likewise never an issue, no matter what socks I wore, my feet were always plenty warm in temperatures as cold as 10F.  The 180 miles on these were not easy miles, either…when conditions were good enough (only patches of snow), I’d use my Neo Trails…I turned to the Winterproofs when it was either snowing or there was significant snow on the ground.  Sometimes that meant running on packed snow, sometimes I was breaking a trail through 6-8″.  Whatever I asked of these shoes, they delivered!

Naturally, all this does come at a price…$160 is the latest advertised price on VivoBarefoot’s website.  However, Vivo is always coming out with new colors for their shoes, sending the old colors to places like LeftLaneSports, so if you shop around, you can find a good deal on them (at the time of this writing, $97 at LeftLaneSports for example).IMG_5454

Review: VivoBarefoot Neo Trail shoes

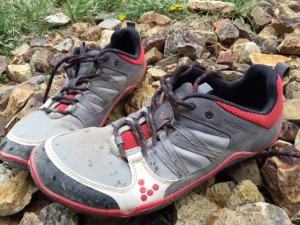
Vivobarefoot Neo Trail shoesThis review is a bit overdue…you see, I’ve put 491 miles on these shoes!  I’ve grown fond of them and yet, it’s time to retire them and move on.  So, as a goodbye, this review.

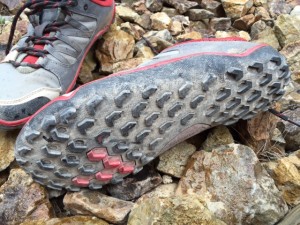
I’m guessing if you’re reading this post, you were directed here by a search engine.  Hence I’m going to assume that you already know why you’d want to consider a trail shoe with a thin 3mm sole and no cushioning!  If not, check out VivoBarefoot’s website.  Yes, the sole is thin, though the large tread blocks add a bit of cushioning compared to 3mm road shoes I also own.  The small tread blocks and thin sole result in a highly flexible shoe that easily adapts to the contours of the trail…a feature I really love.  Protection from sharp rocks is adequate…you feel them, but it doesn’t hurt (my trail runs often include decomposed granite).  The level of grip is phenomenal in any terrain…even snow and ice are easily handled by these shoes.  While water resistant, they’re not waterproof and running through slush and puddles does result in wet feet (imagine that).  That same water resistance means they’re not going to breathe as well as some shoes, but with most of my running in <80F temperatures, I never had any issues with that (but I suspect these might not be the best shoes for hot running!).

I used these shoes primarily to train for a marathon through the winter months in Colorado.  While much of the 491 miles was on dirt and trails, a significant portion was on paved sidewalks and bike paths near the end of my training on the long runs.  I also ran the marathon (paved roads the whole way) in these shoes!  They handled the pavement just fine, and the tall tread blocks seemed to be providing some extra cushioning when compared to my ‘road’ shoes.  Many people online have complained about the tread blocks on these shoes not being durable…but as my 491 miles have shown, if you’re a moderately-paced runner like myself (~10min/mile), they hold up just fine.  A corner of a block or two have broken off, and they’ve worn down in some places to only a couple millimeters left.  That’s the reason they’re being retired..they’re still great shoes, but the depth of tread blocks is no longer as aggressive as I’d like and it’s summertime…time to hit the trails where I’ll need all the grip I can get!

Unfortunately, VivoBarefoot is no longer manufacturing this wonderful shoe (the Trail Freak has replaced it).  You can still find some unpopular sizes online if you search.  Stay tuned for more reviews of running gear, including the Neo Trails siblings – the Winterproof Trail Freaks, and the regular Trail Freaks!Vivobarefoot Neo Trail shoes

Review: Withings Pulse activity tracker

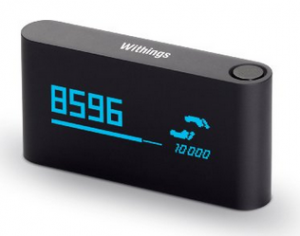
withings_pulseThe Withings Pulse activity tracker is one of many similar products in an emerging market of lifestyle technologies, and one that I’ve been using for many months now.  The Pulse can track how many steps you take, and how much sleep you get, but what I feel sets it apart from other products is its built in heart rate sensor located on the back.  More on that later.

The Pulse is very well designed.  Its compact size is covered in soft-touch paint, and the easy to read display blends in with the enclosure to result in no visible bezel.  Charging is via the included USB cable, and I find the Pulse needs to be charged so infrequently I really don’t know how long a charge lasts (Withings claims a two week battery life, which I see no reason to doubt).  I love the compact size that fits easily into my jeans pockets, though I’m less happy about the included wristband that you use at night.  It closes with velcro and there are times at night when I wake up and notice it’s loose or coming detached, requiring a bit of fumbling in the dark to resecure it.  I find it’s best to start out with a pretty snug closure of that wrist strap, it’s less likely to work loose that way.  The Pulse syncs automatically with my iPhone, and while it occasionally prompts me to restart the iPhone app, I find the overall sync experience to be seamless and effortless.  The display acts as a simple touch screen, with the sole physical button being used to cycle between display modes.  For example, to activate sleep mode, you cycle to the appropriate screen, then swipe to activate.  It’s all very easy to use and intuitive.

Step tracking is one of the big reasons people buy this, trying to hit a 10,000 daily step goal which is loosely based on the Surgeon General’s recommendation of 30 minutes of activity per day.  It seems to work well at this, though I find the mileage calculation to be inaccurate and overly optimistic.  When you use the free iPhone app, you can view your step activity on a daily or weekly basis.  The weekly view just shows number of steps, while the daily view color-codes the activity to represent the level of exertion – in the screenshots below, red was a nine mile jog I enjoyed yesterday (yes, enjoyed!).


activity - weekactivity - day

Sleep tracking is the other cool feature of the Pulse.  The other activity trackers I’ve seen will tell you the amount of time you spend in bed, but to me that’s not nearly as useful as the quality of sleep you get during that time.  The Pulse tracks light and deep sleep, which I assume it’s using the heart rate sensor to help detect (the wrist band has a window to provide a clear sight between the heart rate sensor and your skin).  It also detects time spent awake, though I find that’s not very precise.  As with activity tracking, sleep tracking data is displayed as either weekly summary, or daily view, as you can see in the screenshots below.  What I find really interesting is how sometimes the amount of deep sleep I get is not very dependent on how much time I spent in bed.

 sleep - weeksleep - day
The sleep tracking is really cool to review, especially when you start looking for correlations between how much deep sleep you get, and how you feel the next day.  It’s probably my favorite feature of the Pulse, and what really sets it apart from the other fitness trackers I’ve seen.


The iPhone app will also show data for heart rate measurements, though that isn’t of as much interest to me.  But hey, if that’s your cup of tea, this product also works great for that!  You place your finger on the rear of the Pulse and select the heart rate option on the screen to perform a quick measurement.

The Pulse can be purchased for $100 from Amazon and is well worth the money, provided you pair it with the iPhone or Android App to get the most out of the data.  I have concerns about the longevity of that velcro wrist strap (I worry the velcro will not hold as tightly over time), but this is such a fast-evolving technology that I expect I’ll be replacing my Pulse with a next generation product before that becomes a real issue.

Review: Disruptus

disruptus_coverDisruptus is a fun game that, at its most basic level, is really about brainstorming.  As an engineer, I’ve already realized the benefit of brainstorming new ideas with other people, but this game helps bring that form of creativity to people who maybe don’t deal with this on a daily basis.  While there are ways of keeping score when playing Disruptus, I feel the value is more about the fun and excitement that comes with thinking of new ideas, new ways of doing things.  If keeping score will get people involved, great, but I just enjoy playing the game more than ‘winning’.

The game ships with a set of cards, each with a picture of an object on them (or draw your own object or idea on one of the included blank cards).  The typical way of playing this game will involve using one or two of those cards at a time for one of the following tasks:

  • Create2: Take any number of elements from each card and use these to create a new object or idea.  Draw cards that show a backpack and a sailboat?  Make the backpack out of old sailcloth.
  • Improve: Add or change one or more elements depicted on the card to improve the object or idea.   The card that shows two shelves mounted to a wall?  Join those two shelves together so you only need to attach one set of brackets to the wall, to simply installation.
  • Transform: Use the object or idea on the card for a different purpose.  Use a compass as a bathtub drain.
  • Disrupt: Look at the picture, understand what the purpose is, and think of an entirely different way of accomplishing the same thing.  Instead of a set of three different sizes of kitchen knives, one knife with an adjustable length blade.

When keeping score, a judge will determine whose idea wins.  As the instructions say, ‘ultimately the craziest, most innovative idea should win.’  So maybe the examples I listed above aren’t going to lead me to victory, but you get the idea!

The rules seemed, to me, pretty loose and disorganized, at least compared to other games I’ve played, and I wasn’t sure how it would go.  I was really surprised to find that the other adults I played it with quickly got wrapped up in the game and were having fun….it wasn’t so much about ‘winning’ or keeping score, but more just for the fun of it.  Deviating from the written instructions is, I think, one of the key aspects of this game and is even encouraged by the creators.  At its core though, it remains a great way of getting into that brainstorming frame of mind – whether you choose to be competitive and use the timer and scoring, or just want to have fun.  Check out the video below for more details on gameplay.

I found it really easy to adapt the game to younger kids (my six year old daughter and her cousin).  While camping as a group, we played this game around the campfire, with a variation of the Create2 play.  Rather than taking pieces from each image or idea to make something new, the kids really liked just taking the whole idea or objects and combining them.  For example, let’s say you draw cards with a watch and a stapler.  The kids would say you could put a clock in a stapler so you always know what time it is at your desk.  It’s pretty basic, but I think it’s a good way to get them to start visualizing new ideas and inventions, and a good stepping stone to thinking of ideas that just take *parts* of those objects to make something different.  Us adults around the campfire all busted up laughing though when I drew cards with a stoplight…and a bed!  A bed with a stoplight built in?  I could see that being a successful Kickstarter project…

If your kids watch Phineas and Ferb, they’ll quickly latch onto this game as it’s very similar to the fantastic inventions Phineas and Ferb create in their backyard (not to mention Doofenshmirtz‘s -inators).   As a quick side note – Phineas and Ferb is a great show for kids and adults and is of similar mindset as this game – be creative, think outside the box, know no boundaries, and have fun.  I highly recommend that show, and you can find it on iTunes or Amazon.

Disruptus could also be a fun team building activity at work, especially if your employees don’t already engage in team brainstorming as part of their normal routine (from my experience, few companies truly do this).

You can find Disruptus at Funnybonetoys or Amazon ($24.99).

Proudly powered by WordPress | Theme: Baskerville 2 by Anders Noren.

Up ↑